Spectator Displays are optional components for an Athena range that allow spectator, coaches, and athletes "watch the action" on the range. The MM100, Athena's Spectator Display module, plugs into any HDMI TV and can be configure to display live target images, ranked lists, and more.
Take Ownership of the Display and Configure within Orion
Similarly to 4. Assigning Targets and Monitors to Firing Points
Note: the MM200 has USB ports available on the top edge of the display.
1.It is recommended to plug MM100 and MM200 units into a TV or other HDMI display during Take Ownership to ensure it's successful completion.
2.Use your the USB Key provided in the Support Resources Kit to connect your Display to your Athena Range.
3.Use Orion's Range Configuration Form to assign your Display a Display Number. Open this form from the menu Athena -> Assign Targets and Monitors to your Range.
4.Click Save, then run the Network Manager update to complete the set up.
Setting Up the Spectator Display with Your TV's HDMI
Each MM100 plugs into one HDMI TV (sold separately) using an HDMI cable.
Set the TV up according to the manufacturers instructions. TVs are best placed in areas that coaches and spectators can easily see them.
TV's Manufacturer's Updates
Today's smart TVs often need updates from their manufacturers. Sometimes these updates include important power settings that help make the TV more efficient. It is important to install these updates when available. To do so you will have to connect your TV to the Internet, and then download and install the updates. Check your TV's manufacturer's instructions on how to do this step.
TV's Aspect Ratio
Adjust the Aspect Ratio of the TV if necessary.
If you purchased a TV sold by Scopos click the menu button -> input settings -> HDMI-1 (or whichever input the MM100 is on) -> picture size -> adjust the screen size.
Powering the MM100
There are two ways to power the MM100. The cables for each option come with the MM100.
•Plug the MM100 into it's own wall power socket.
•Plug the MM100 into a USB port that provides 5.1V with 2.5 Amps. Many modern TVs (including those sold by Scopos) have a USB port on them.
IMPORTANT: If you use this option to power the MM100 and on the output display there is a message "Low voltage warning. Please check your power supply," you will have to switch to using the wall power socket. This warning message should not be ignored and is known to cause connection issues with the Athena Network.
Setting Up the MM200 for range timing only
The MM200 unit comes equipped with an LED matrix display for showing the range timing and another spot to see the X and O graphics.
It is recommended to plug MM100 and MM200 units into a TV or other HDMI display during Take Ownership to ensure it's successful completion.
It is best to place the MM200 in a location on the range that all athletes can see while on the firing line. Down range, or to the left or right side of the firing line, usually up high for visibility, are some good places for this unit.
In addition to being an automatically controlled range timer, the MM200 can be used as a spectator display by using an HDMI cable and following the same setup procedure as the MM100.
Both the range timer and Spectator Display functionality may be used congruently.
Powering the MM200
Please only power the MM200 from the provided 5V 6A barrel connection.
Setting Up the Display Image Keys
Spectator Displays can show a wide range of images on your range. Everything from your Club Logo, to range safety rules, to pictures from your latest match, to the History of Marksmanship. As you are setting up your range you may only want to use the default images that come with Orion and Athena. To set up the default images :
1.Open Orion, and from the menu bar click on Athena -> Edit a Display Image Key File
2.The default Image Key Mapping file is named, "AthenaDefault.json". It should already be selected, and listed next to Image Key File.
3.Optionally, use the drop down next to Image Key to see the default images that come with Orion and Athena.
4.To send these images to the Spectator Displays click on "Upload to Athena."
5.When prompted type in the Username and Password for your Network Manager. This information may be found on the Customer Information Sheet included with Athena.
6.If successful, Orion will send the images to the Displays and then close the form.
To learn more about Display Image Keys visit Edit Display Image Keys Files.
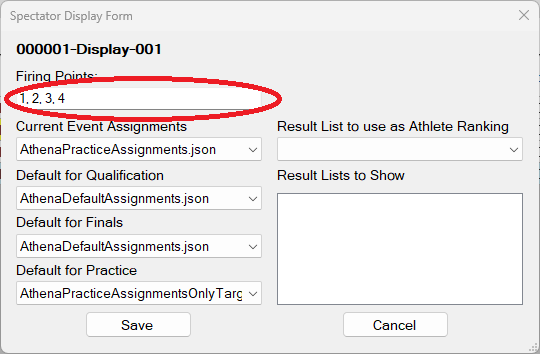
Mapping Firing Points to the MM Spectator Displays
Each MM100 can display live target images from 1 to 16 firing points, or none at all. To configure which firing points are displayed on which MM100 use the Orion Range Control tab.
1.Open Orion and select the Range Control tab.
2.In the bottom third of the screen lists each MM100 Spectator Display installed on your range. Double click the row representing the MM100 you want to configure. This will open the EST Display Form window.
NOTE: If you do not see the Displays listed you may need to re-download your Range Configuration files. See "Downloading New Range Configuration Files" below.
3.At the top of the form, type in the firing points you want to assign to this Display. Separate the firing point numbers using commas or spaces.
NOTE: The MM100 can only display 8 firing point's at a single time. If more than 8 are typed in, the Display will rotate the images.
4.Click "Save" to send the new configuration to the Display.
See Also
•Edit Display Image Keys Files
•Edit Display Event Mapping Files
•Configuring the Spectator Display