After the match is set up, the next step in the process is to prepare targets to be shot. Without any additional information, it is impossible for Orion to know who shot which targets. The most common way to convey this information is to use "barcode labels."
When using Orion Scorecards, you may either use barcode labels or the athlete may fill in his or her competitor number using the provided fill-in-the-bubble area. Note: Using barcode labels is not a requirement for Orion. An alternitive method is to use the name-based competitor numbers. Details of this method are beyond the scope of this introductory guide. For more information visit our using text-based competitor numbers support article.
For Orion at Home users, it is common to have only one competitor in the match. If this is the case, barcode labels are not needed. When there is only one competitor, Orion will automatically assign scanned targets to that competitor. Where available, fill in the Position and Series bubbles, on the top right of the target, allowing Orion to read this information when the tartget is scanned. |
Barcode labels are small return-address size labels that have a barcode printed on them directly from Orion. Orion will print a unique barcode label for each shooter in the match and for each target that a shooter will fire in the match. For example, if you are shooting a 3x10 Air Rifle match, Orion would print three labels per shooter (prone, standing and kneeling).
Barcode labels are encoded with two pieces or information. First, the shooter's unique competitor number. Second, the target number, one for each target the shooter will fire in the match.
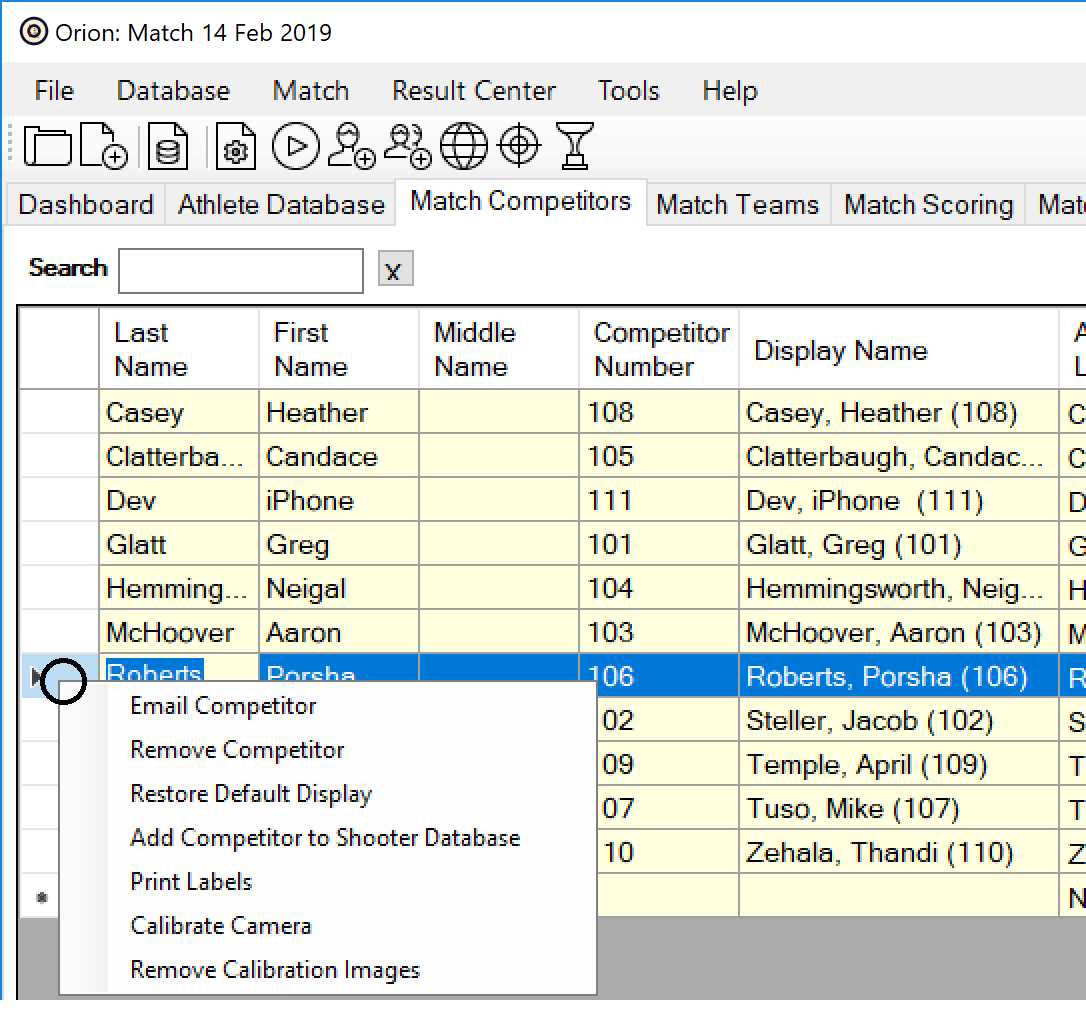
Follow the steps below to print and use barcode labels for your match. 1.Load your printer with blank barcode label sheets. If you purchased an Orion for Clubs bundle from Shooter's Technology, these labels were included with your purchase. 2.Inside of Orion, click on the Match Competitors tab. 3.Select the shooter you want to print labels for by clicking on the far left column (the column to the left of "Last Name"). The entire row will turn blue once selected. Hint: You may select multiple shooters by holding down the control key on your keyboard. 4.Right-click and select Print Labels.
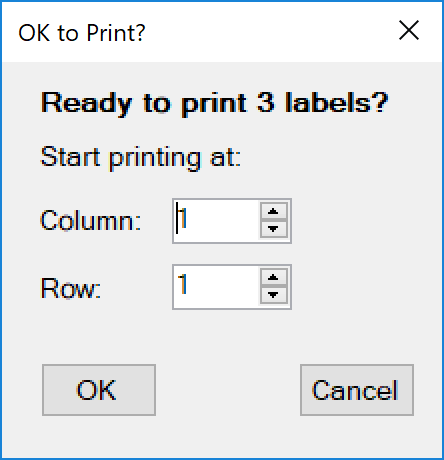
5.Orion will display the Ok to Print dialogue box. In this window Orion will confirm the number of labels it is about to print and where to start printing. 6.Since this is likely your first time using Orion, you are starting with a full sheet of labels, thus starting at Column 1 and Row 1 is correct. In the future, you will have many partially used sheets of labels. With this dialogue box you can reuse partially used sheets by specifying where to start printing. 7.Click OK when ready.
8.On the Print Dialogue screen make sure you have the correct printer selected and click Print when ready.
Finally, apply the labels to the targets. •Apply one barcode label on each target. Placing it over the Competitor Number box or Competitor Number fill-in-the-bubble area. Note: the first line of the labels list the athlete's name, competitor number, and abbreviates the position and series. The second line lists the athlete's relay (delnoted with an R), firing point (denoted with FP) and team or organization. •The position and series bubble should be left blank when using the barcode labels.
Example of proper barcode label placement. |
At this time you may have your athletes take their targets to the range and fire at the targets according to the previously selected rulebook and safety regulations.


